skip to main |
skip to sidebar
This week in Science we are learning all about soil. We are learning the different layers of soil and then we will compare the soils sand, silt, and clay. I used our textbook to help me as I made these two activities for my class to complete.
Soil Horizons
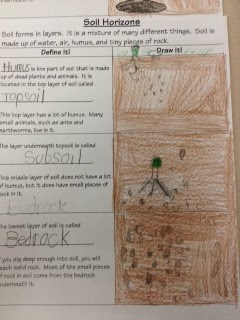
Soils form in layers. It is a mixture of many different things. Soil is made up of water, air, humus, and tiny pieces of rock. This worksheet helps students learn and visualize the 3 layers of soil. They are topsoil. subsoil, and bedrock. After they define these, they will draw to show what is contained in each layer.
Investigate Soils Lab Activity
Materials needed: lab sheet, plates, sand, soil, clay, and hand lens
Students will observe sand, silt, and clay. They will describe how each soil looks and how they feel. Then they will use a hand lens or magnifying glass and draw the different sizes of grains on their lab sheet.
This activity helps the students to be able to compare and contrast these three soils.
They loved being scientists!!
This year my class is Chewin' Up Multiplication Facts! We started passing off multiplication facts at the end of September. Our goal is to have mastered all multiplication facts to 12 before Christmas Break. My original idea was to have Skittles in my candy machine and each student gets a handful of skittles after they pass each fact off. Well, my candy machine ended up unloading about 20 Skittles at a time, and that just wasn't going to work. The current plan is that when they have passed off through the 9's facts, they will not only be rewarded with a popcorn and movie party, but also their own pack of skittles!
We are keeping track of our progress. First, we want to show off to everyone in the hall how we are doing on our multiplication facts. Since my theme in my classroom is zebra, I made our huge gumball machine and decorated it with some zebra stripes.
I cut out and laminated different color circles and wrote numbers on them to represent which multiplication fact was mastered. When a student passes off a fact, we add that number fact gumball onto our class gumball machine. Look how well we are doing so far!!
Then I wanted each student to have their own visual to see how well they are doing. I printed off a gumball machine picture that I found online, blew it up a little, and printed it on cardstock. I let each student decorate their own how they liked and we put them on our classroom door. When they pass off a multiplication fact, I give them a colored circle sticker to add to their personal gumball machine.
The students love visuals and to be able to see how they are doing each week. Keep Chewin' up those facts!!
Today my class made these I am Thankful Turkeys. After cutting out the pieces, they wrote I am Thankful on the turkey's belly. Then on each feather, they wrote something they are thankful for. I was proud of what they wrote: Peace, God, Christ, Family, Friends, Food, and yes, even SCHOOL!! I am thankful for such a wonderful class! Happy Thanksgiving!!
We are so proud of a member of our class who won First Place in the Peanut Festival Poster Contest! She did an awesome job on her poster and we love to brag on her and all of our classmates who work hard on everything they do! Great job!
I love doing the Monster in a Jar Writing Activity each October. I found this idea several years ago online, source unknown. I first introduce my students to the activity by talking about what if they found an interesting creature, or monster, and what would they do if they caught it. Then we talk about what their monster may look like. I put their ideas on the board. After a good discussion, I give them their own copy of a big empty jar. They create their own monster in a jar and give it a name.

The next day we begin writing our story about our Monster in a Jar into a 5 paragraph form. I teach my students how to write 5 paragraphs using my school system's Writing Rubric. There are 10 standards they must master and among those they have to use at least three WOW words, which I tell my students to use different, big, descriptive words. They also have to use at least one MOPSI word, which I begin with teaching my students to use at least one simile and one onomatopoeia. The paper as a whole may take several days to complete. I explain how to write each paragraph as we go along. When the students finish, they have a really cute project and writing activity complete! So much fun!!
My 5 paragraph format:
Introductory Paragraph: What is your paper about?
1st Detail paragraph: Describe what the monster looks like (color, head, face, eyes, nose mouth, arms, feet, body, etc.).
2nd Detail paragraph: Describe how you caught the monster (where did you find it, is it easy or hard to catch, did you need tools to catch it, did it try to get away, etc.).
3rd Detail paragraph: Explain what you are going to do with your monster (does it have a name, is it nice or mean, does it make sounds/talk, what do others think about it).
Concluding Paragraph: Give an overall view of your monster and tell if you think you will keep it forever.
Here are examples of my students' work:
What better way to kick off Fall then a lesson on the life cycle of a pumpkin! First, we started with a pumpkin. The top was cut off and the students got to look inside and touch the seeds and all around inside the pumpkin. Eww! Gross! were some comments from the girls. Cool! Awesome! were some comments from the boys. I let the students scoop the seeds out. We talked about where those seeds had come from. The seed was produced by the "flower" of the pumpkin. A tiny new plant is inside each seed. Then I told the students that the now empty pumpkin was going to be used as the planter. We would add what all plants need, soil, into the pumpkin and plant those pumpkin seeds that they had just pulled out. We would give our pumpkin plant water and sunlight and see what happens.

Each day we discussed what was happening with our plant. First, the seed split open. Tiny roots grew down into the soil. Then a little sprout came up out of the soil after about 5 days. As the stem grew, leaves began to grow off of it. These leaves make food for the pumpkin plant. Every day our plant grew taller and had more sprouts and more leaves. All of the stems are covered with leaves. My class had a week out of school for Fall break, so I took it home with me to take care of. When we came back to school and the students saw how much the plant had grown, they were AMAZED! I told them that I would take it home and try to keep it alive in my garden. If it stays alive, it will bloom and produce a new flower which will turn into a new pumpkin and the cycle will start all over again! I hope it does so I can see their reactions!
Welcome to my blog! Third grade is tough. Seriously. But with the right attitudes and support, amazing things will happen! Join me as I share just a glimpse into my third grade classroom and find out just how much we are learning! Seriously...